What is the Three Peaks Challenge in Iceland & how to Prepare for it
| All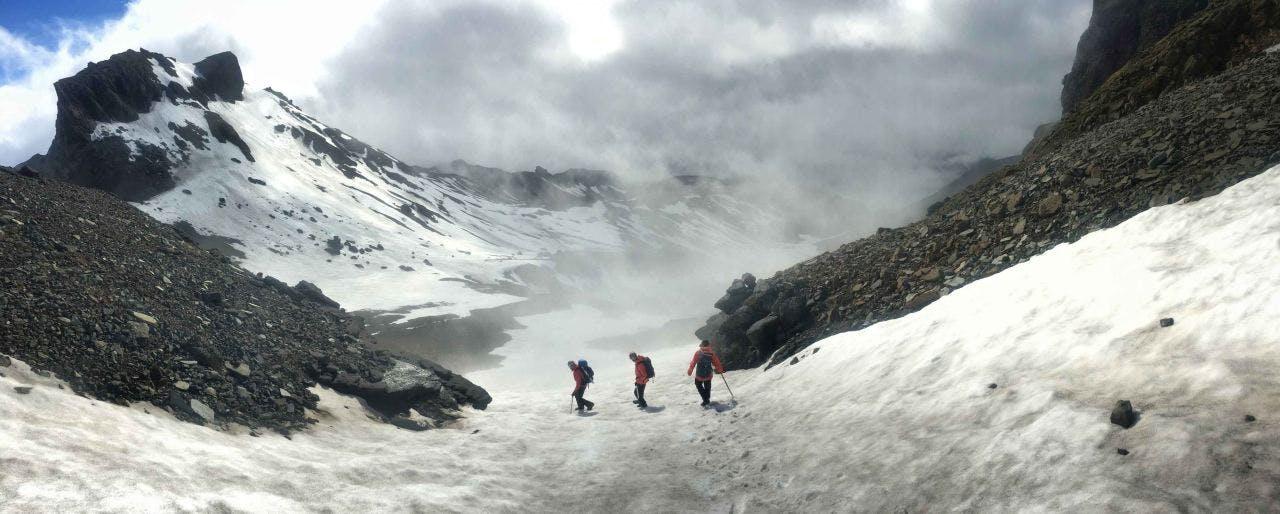
So what is the Three Peaks Challenge in Iceland? Well, the name says a lot, but perhaps not enough: there are many peaks in Iceland, and choosing three was tricky. We considered that you may want to see different parts of the country, from the coast to the highlands, and not jumping in at the deep end. So what about the peaks themselves? Here they are, in order:
The Three Peaks Themselves
The first peak is Mt Hengill; at 805 m (2640 ft), this starts us off on an easy introduction to the Three Peaks Challenge in Iceland.
The second peak is Mt Hekla; at 1491 m (4890 ft). See what’s happening here? They’re getting higher.
Please note Hekla is an active volcano that is actively monitored by the Icelandic Civil Protection Authority. The Authority may cordon off the volcano if it is deemed to be unsafe; if this happens, we will select another peak for the replacement.
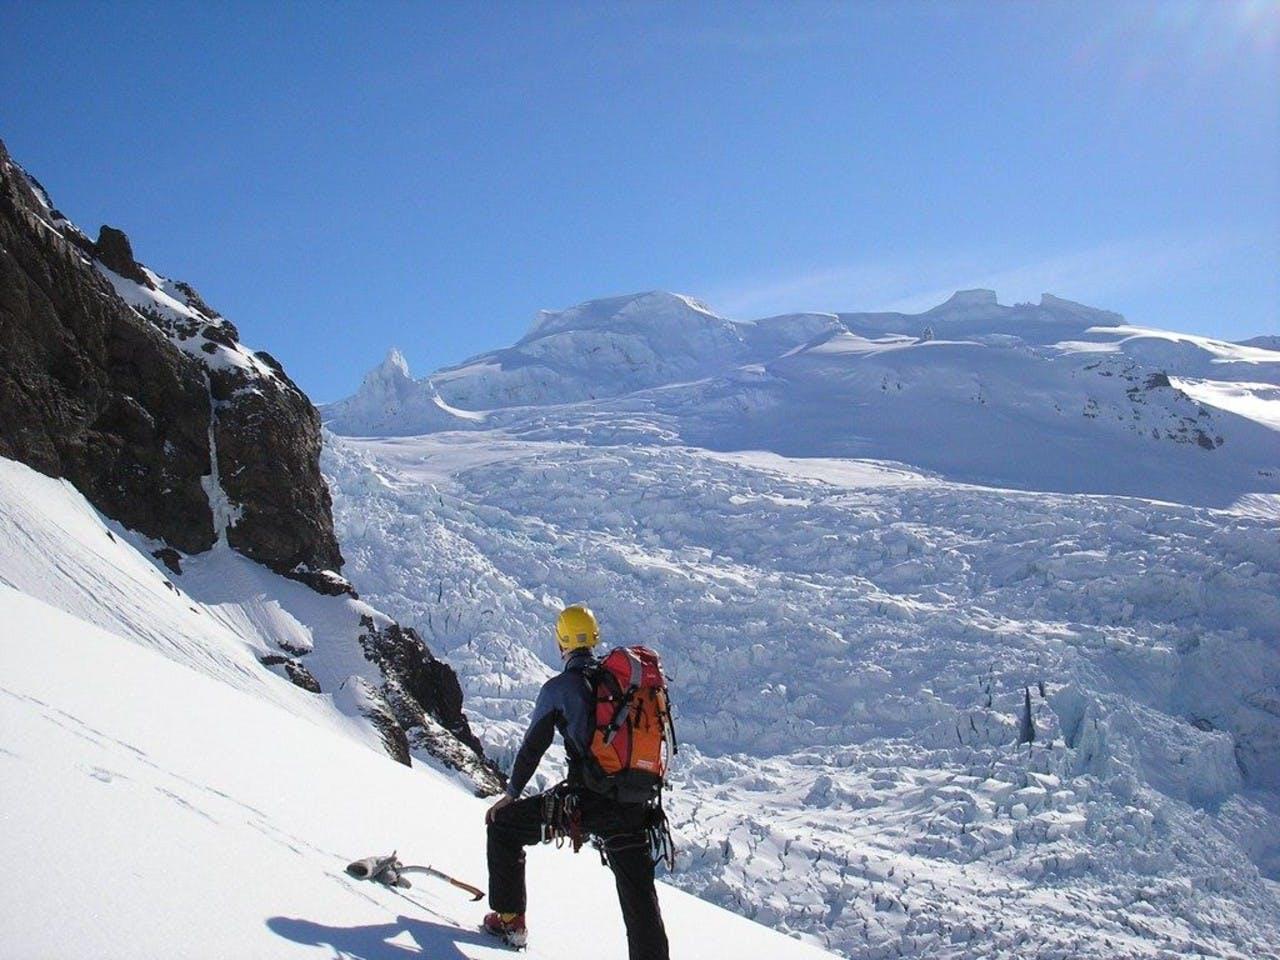
The third and final peak is Iceland’s highest peak, Hvannadalshnjúkur, standing at 2110 m (6921 ft) Clearly the greatest challenge of the three, and possibly the most rewarding. This is a perfect finale to an epic trip.

We rate the Three Peaks Challenge in Iceland as "4" in difficulty level, defined as:
Demanding some effort and certain endurance. Good health and some hiking experience is required. 6-8 hours walk per day. Often involves carrying your own gear.
That Road
And then there’s the road between the peaks: we will take through epic highland roads that will see you through the most spectacular Icelandic highland plateau, you will see a kaleidoscope of colours and features that you never even thought possible.
This extraordinary natural beauty will punctuate the entire trip, and the peaks themselves will provide for some breathtaking views. This leaves aside the idea of perspective; having covered a considerable territory (think half the country) and have a summit view at three different points which are very well spaced.
After summiting Hvannadalshnjúkur, we will begin you back along the iconic Route 1, where you will see a very different landscape along the coast
How to prepare for The Three Peaks Challenge in Iceland
For a trip like this, preparation is key. While none of the peaks in the The Three Peaks Challenge in Iceland can be considered “high” altitude, which is generally considered in alpine mountaineering to be between 12000 to 18000 ft, it is still important to undergo the right physical equally important mental preparation in order to complete the Challenge.
First, a word on gear. The gear you need to get you through a challenge like this is really important. First and foremost, make sure youknow your gear inside out. Try to avoid buying brand new gear just before leaving. Know your gear inside and out; every sinew, every inch. Refer to our gear lexicon at the end of this post for a comprehensive list of all the things that you should consider for a trip like this.
Second, your physical preparation. Practice carrying a pack over long distances and climbs. Stretch, make sure you have a full range of motion in all of your joints, and allow at least 4 weeks of cardiovascular and muscular training prior to any serious mountaineering. Making a pack is also an art form; heaviest things should g close to the spine and lighter items should be easily accessible.
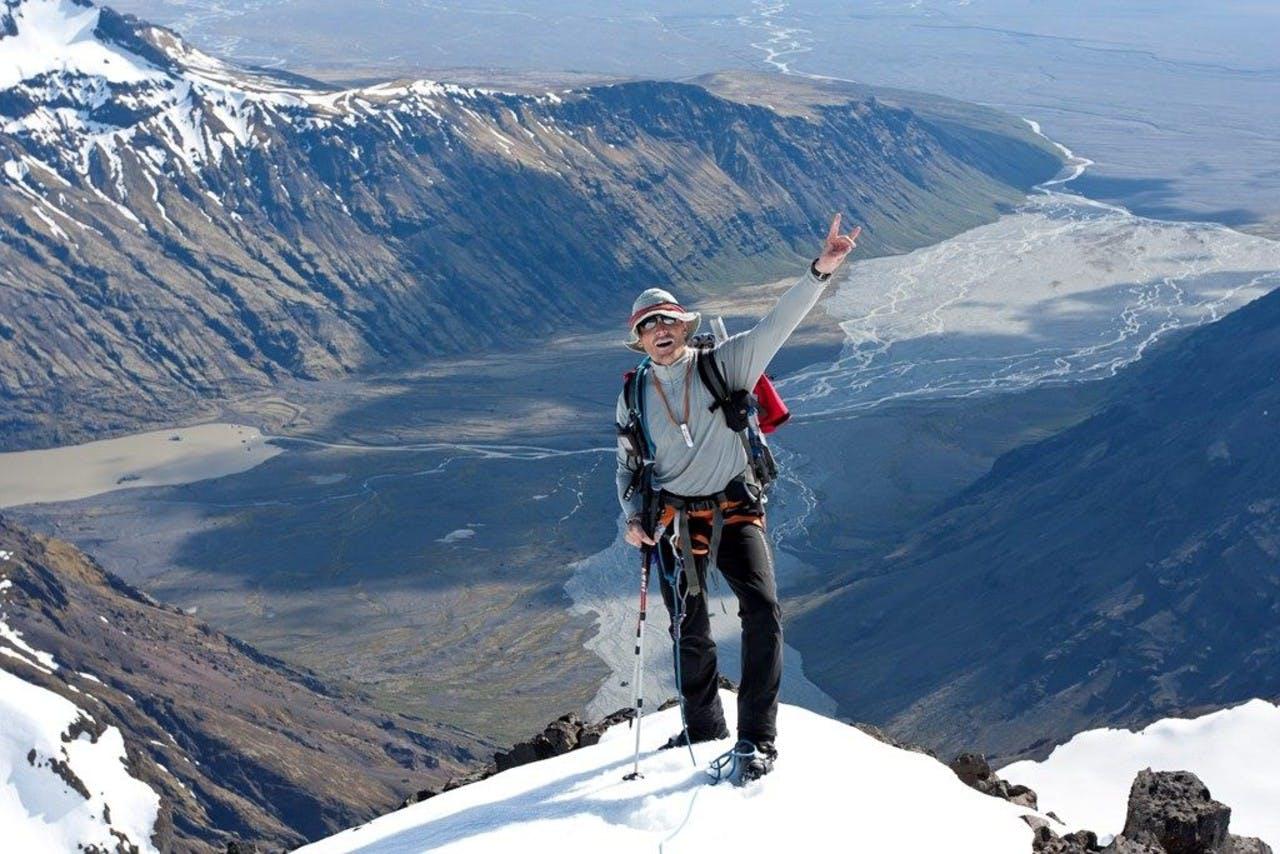
Really, though, all we are saying is that we like to see active people take on the Three Peaks Challenge in Iceland. Active people like Georg, who came out on the Three peaks Challenge last summer. He had this to say:
Walking on a mountain rim between two big glaciers which run down from 2000 m down to sea-level and end up in a glacier lagoon is just such a unique experience.
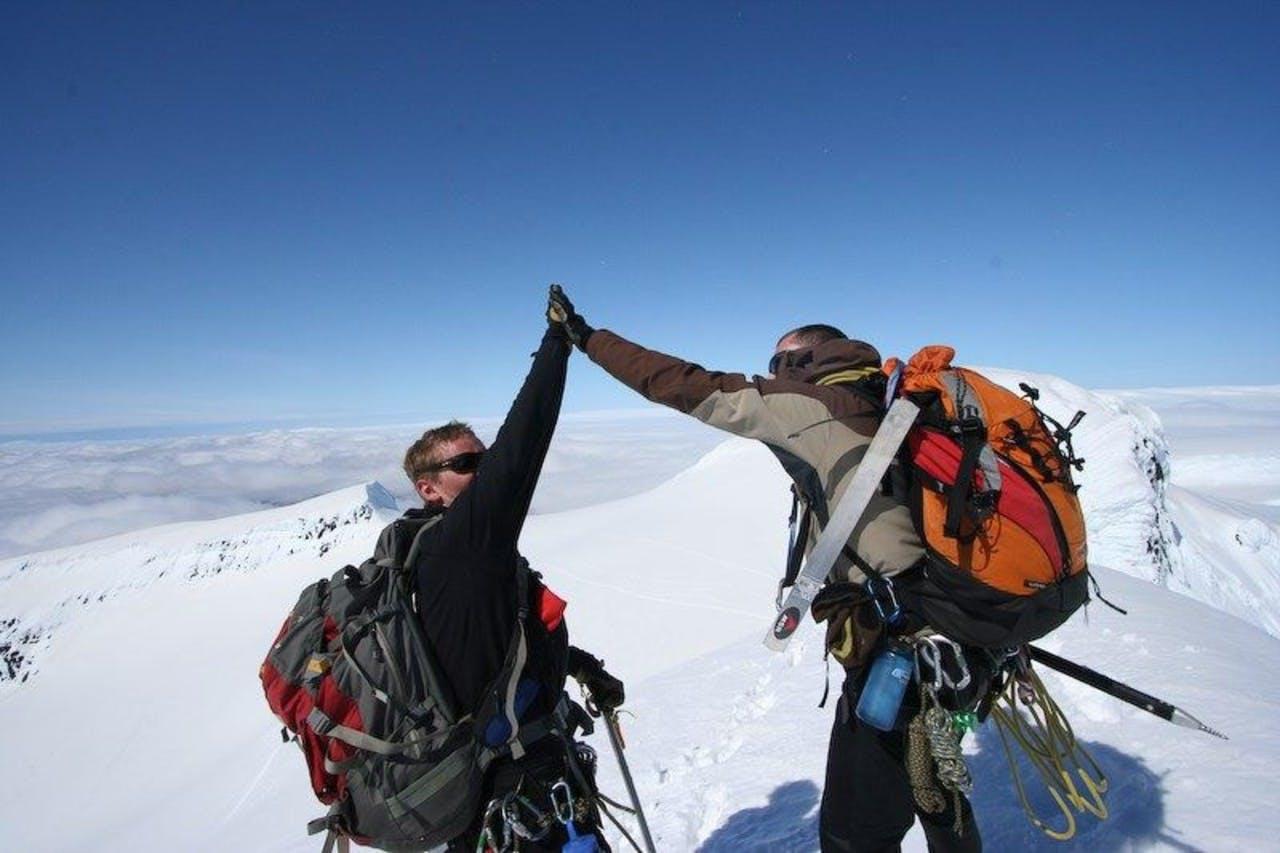
One Group: One Goal
When you take on the Three Peaks Challenge in Iceland, you will be supported along the way by not only guide, but also the group. You will be in a group of up to 12 people, all striving towards this common goal of completing the Three Peaks Challenge. By the end, you will know everyone quite a bit (maybe even a lot) better. You may even learn something about yourself. You may decide to push yourself further next time. If that is the result, then we will have done our job. Now, onward, and Three Peaks Upwards!
Gear Lexicon
Hiking Boots
Sturdy hiking boots with good ankle support. Leather or synthetic with a waterproof membrane, e.g. Gore-Tex. Make sure they are a good fit, leaving some space for your toes – and wear them in, even if it is just by light hiking in the city.
Jacket with a good hood (wind and waterproof)
We recommend a water resistant or waterproof “hard-shell” jacket with a large protective hood, and a Gore-Tex membrane, or similar material, to keep you dry. Make sure it is not too tight and that you can fit insulation underneath. Please note that a soft-shell jacket is a great addition but will not replace a waterproof hard-shell when you really, really need one! Good rain-gear, tops and bottoms are mandatory on all IMG tours.
Hard shell pants (wind and waterproof)
Ideally the hard-shell-pants should be lightweight, as they will be in your backpack most of the time. If they have zip-up legs to ease getting into it is a big bonus. Make sure they are breathable and strong enough to take some abuse from walking. We often see cheap rain pants disintegrate during the tour. Gore-Tex or similar waterproof breathing membrane is appropriate. Good rain gear, tops and bottoms are mandatory on all IMG tours.
Base layer
The most popular thin base layer (next to skin) is made with merino wool because it is comfortable to wear for multiple days without the smell of synthetic materials. Most people should be fine with wearing the same merino shirt for 2 – 3 days on harder tours where weight matters. A thicker base-layer for colder days could also be a part of your adjustable layering. We recommend packing short and long sleeve options to adjust to different weather conditions. Women might want a sports bra as a part of their base layer. Cotton t-shirts are not advisable for any strenuous outdoor activity.
Insulation layer
A fleece jacket is a classic insulating layer material. Wool is also a good option. It is possible to layer up – two thin jackets or a jacket and a vest rather than one very thick jacket.
outdoor activity.
Insulation layer
A fleece jacket is a classic insulating layer material. Wool is also a good option. It is possible to layer up – two thin jackets or a jacket and a vest rather than one very thick jacket.
Hands, feet and head:
Gloves: A light pair of fleece or wool gloves/mittens does the job. You can also take a pair of ski-gloves or other wind and waterproof shell gloves. Having an extra pair of different thickness is recommended.
Socks: Wool is the preferred material for skiing socks, and different blends are available. If you are prone to blisters or have new boots, you should consider wearing a thin liner sock underneath your socks in your ski boots. Make sure you have a few pairs of socks to use to keep your feet dry.
Warm hat: A normal ski-hat/beanie is perfect. You can also use a thick buff. An extra buff is nice to have - you can use it to protect your neck and face when needed, or as a thinner option for a hat.
Puffy Jacket
A light puffy is great during breaks. The insulation could be down or synthetic material (such as Primaloft). It should not be very big or bulky for summer time use. Synthetic insulation is preferred as it keeps most of its insulating properties when wet, but down is also a good option. A puffy vest is a good option as well.
Casual clothes / change of clothes
Once in the hut, it is good to be able to change out of your trekking gear. We highly discourage you from wearing cotton clothing (including jeans!) while skiing or hiking but you are welcome to wear them in the hut/tent in the evening. If it is cold, a warm sweater (jumper) or an extra fleece jacket is always nice. We always recommend having a few pairs of comfy socks and some fresh underwear. Avoid bringing too much extra clothing. Life in the mountains is simple and nice, so one pair of extra pants, a warm sweater (jumper), a few t-shirts and underwear should do the job just fine. Light sneakers and slippers for indoor use will feel great at the end of the day
Duffel-bag
On many of our tours your overnight gear is going to be transported from hut-to-hut / camp-to-camp and space is limited. We therefore ask you to pack your gear in a soft bag rather than a regular hard suite case, since this is more space-efficient. A 60 - 80L bag should be more than enough for all your extra kit including a sleeping bag. If it is reasonably waterproof that is a big plus.
Backpack / day-pack
You will need a nice daypack to carry your extra clothes, river crossing shoes, food and water for the day. Having a compartment for smaller items like sun screen and sunglasses is also good. The pack will never be heavy, but a bit of padding on the shoulder- and hip straps/belt with a buckle is good. Unless you have some bulky personal needs, like photographic equipment, then you should be fine with 20-30L (1200 - 2000 cu in).
Dry-bags
There are plenty of different products available for storing your equipment inside your pack and keeping it dry. A rain cover over your pack often has limited use due to high winds– a safer option is to pack whatever needs to be kept dry into dry-bags inside your back-pack. It is also a great way to organize the inside of your pack. One bag for electronics (camera and phone) and one bag for extra clothing, as an example. Note that dry-bags were out and might not be as dry as they were when you first bought them.
Sleeping Bag Hut
The mountain-huts during the summer are usually warm, although most are not heated during the night. Any old sleeping bag will therefore do, unless you get cold easily. For temperature control having a full length zipper is the best. A liner bag is also a very nice addition and will improve your ability to regulate your head during the night. If you are doing a winter hut trip or summer camping a 3 season sleeping bag would be sufficient. All the huts we use have mattresses on the beds so no need to bring your own for huts.
Head-lamp
Even though the summer night is bright, the inside of the hut/tent might not be. A headlamp is also useful for those that want to do some reading. There are plenty of options available for LED head lamps that are just perfect for reading and getting around. A small flashlight will also do the job. Most LED headlamps have more than enough light for our purposes and the battery life is so good that one fully charged battery will be enough for your trip.
Sun
A baseball cap or a comfortable hat with brim is great to have and is useful both in sunny and rainy weather. You should also have a nice pair of sunglasses and some sun-bloc – SPF 15-25 should be enough protection for most. If you plan to be playing on snow covers summits you should bring a pair of quality sunglasses for mountaineering SPF 30 – 50 sunblock.
Swim suit
Bathing in the natural hot pools will be one of the highlights of your trip in Iceland. Make sure you come dressed for the occasion. There are no specific rules, written or unwritten on how to dress or not to dress; board shorts, speedos, bikinis or bathing suits – anything goes. Quick drying material is always a good idea.
Trekking pole(s)
One or two poles are nice to have. Some trekkers like to use them all the time, other use them only during river crossings or on steep ups and downs. If you like them, make sure that they are foldable and light weight. A small basket is also nice.
Gaiters
Gaiters are recommended on snow covered mountains – Gore-Tex or similar “breathing” membrane is the best.
Mountaineering Equipment
On the summits where specialized mountaineering equipment is used it is also included in the tour – so no need to buy it or bring it. You are of course welcome to bring your own gear if you like. For glacier covered summits you will be issued with and Ice Axe, Climbing harness and Crampons. In certain cases you might also get a helmet.
Thermal mattress
It is really nice to have a small thermal mattress to sit on during lunch break and other stops. It should not be big, just enough to sit on. And it should fold up nicely so it does not get in the way inside your pack.
Personal items
Make sure to have all your prescription medication with you. If you have any medical condition that could in any way affect you during the trip, make sure to let your guide know. For those suffering from allergies, having an antihistamine is advisable – or any other medication that works for your condition. Items for personal hygiene should also be included, such as a small bar of soap or some liquid hand soap. We recommend packing a toothbrush, toothpaste and dental-floss. Avoid liquid antiperspirant and glass containers due to risks of spillage. Feminine products like pads, tampons etc. should also be packed, if needed. If you take vitamins or other supplements, you should continue to do so during your holiday. In most cases, you are sharing sleeping facilities with one or more fellow travelers – so a pair of good ear-plugs can ensure a good night’s sleep. Those not accustom to the bright summer nights might want to bring an eye mask. Please make sure to pack extra contact lenses (if needed), contact lens cleaning solution, shampoo, conditioner and shower gel in small plastic bottles that close tight. A big towel is nice to have – especially if you are taking a bath in one of the natural hot-pools.
Personal first-aid-kit
All the guides on our tours will have a first-aid kit available. However, it is still nice to have some small items for minor injuries. Band-Aids, Compeed for blisters, pain killers and/or anti-inflammatory drugs are recommended personal first-aid kit items.
Other cool things to have
Book to read during the evenings.
Music and head phones. Some of our guides also have speakers with them to share Icelandic music.
Diary or notebook to write down your good memories from Iceland. Also, a pen or pencil.
Power-bank / extra battery for your electronics small solar cells usually do not work that well in Iceland, so a pre-charged power bank is a better option. Charging your electronics in huts in the highlands often is not an option or will cost you extra. Make sure you have an adapter plug and/or a voltage converter for 220 V.
Playing cards and travel games or other toys you might like and can travel.
Cash showers in mountain huts normally cost about 500 ISK and take 100 ISK coins.
Travel pillow if it is not very bulky. Otherwise, you can just use your clothes.
Powder drink mix, good water is never a problem – but you might like a bit of variety. Some powders contain vitamins and minerals that help your body after a hard day.
Shorts, it does get warm enough to wear shorts on occasions. They are also nice for sleeping in, and can be worn if you need to get out of your sleeping accommodations at night. For hiking, it is nice to have some pockets to hold items that would normally be in the pockets of your pants. But any old pair of shorts will do.
Aperitif or other heart-warming spirits
Aperitif or other heart-warming spirits, liquor laws in Iceland prohibit the sale of alcohol in most places you come by on your trip in the highlands. Additionally, limited opening hours prevent you from buying alcohol in most places unless you are staying in a hotel. Having a flask (preferably plastic or metal) to share with your fellow travelers in front of the camp fire (gas heater) can be a great way top off a good day. You can buy alcohol in the duty-free shops upon your arrival in Iceland. Just follow all the Icelanders on your flight – they will take you straight to duty-free! Also, there are government run alcohol stores in Reykjavík called Vínbúðin. If time allows, you can purchase alcohol there but alcohol is much less expensive in the duty-free shops at the airport.
On trips to Greenland, you can buy alcohol in the duty-free shop on arrival in Iceland. Duty free in Kulusuk, Greenland does not sell high % spirits but if you make it to the supermarket they will have beer.
Keep me informed about the Icelandic Mountain Guides Blog
Outdoor adventure in Iceland is our specialty. Subscribe to our free monthly newsletter to learn when to go, what to do and where to have the best adventures in Iceland.